By: Team T12-3 Since: Feb 2019 Licence: MIT
- 1. Introduction
- 2. Quick Start
- 3. Application Interface
- 4. Features
- 5. Commands
- 5.1. Viewing help :
help - 5.2. Adding a new medicine :
add - 5.3. Listing all medicines :
list - 5.4. Locating medicines :
find - 5.5. Editing a medicine :
edit - 5.6. Deleting a medicine :
delete - 5.7. Viewing medicine information page :
select - 5.8. Sorting the batch table :
sort - 5.9. Updating batch records :
update - 5.10. Managing the warning panel :
warning - 5.11. Exporting as CSV file format :
export - 5.12. Printing labels :
label - 5.13. Listing entered commands :
history - 5.14. Undoing previous command :
undo - 5.15. Redoing the previously undone command :
redo - 5.16. Clearing all entries :
clear - 5.17. Exiting the program :
exit - 5.18. Saving the data
- 5.1. Viewing help :
- 6. Frequently Asked Questions (FAQ)
- 7. Commands Summary
- 8. Terminology
- 9. Appendix A: File Naming Convention
1. Introduction
Welcome to the MediTabs User Guide! Over here, you can find step by step instructions on setting up MediTabs and learn ways to take advantage of the features provided to optimise your clinic’s inventory management. Interested? You can jump to Section 2, “Quick Start” to get started. Enjoy!
1.1. What is MediTabs?
MediTabs is a desktop application for managing medicine stock taking. Managing medicine can be time consuming and frustrating due to the overwhelming number of medicines in the market. Thus, MediTabs was created to provide pharmacist with a straightforward and efficient way to keep track of and maintain their inventory.
With MediTabs, medicine data is organized in a format that helps you quickly locate the information you need. MediTabs also sieves out and provides you with critical information such as which medicines are low in stock, expiring soon or have expired so that you can ensure your inventory is well maintained. Functionality to help you with tasks which require medicine data such as medicine labelling and inventory analysis is also provided, making MediTabs the only application you need for all things inventory related.
MediTabs supports Windows, Linux and macOS operating systems.
1.2. Who is it for?
If you are looking for a medicine stock taking application for clinics, MediTabs is the product for you. Whether you are an owner of a clinic or a pharmacist in charge of your clinic’s medicine inventory, you can use MediTabs to help improve your workflow. It is optimized for those who prefer to work with a Command Line Interface (CLI) while still having the benefits of a Graphical User Interface (GUI). If you can type fast, MediTabs can get your medicine stock taking done faster than traditional GUI apps.
2. Quick Start
-
Ensure you have Java version
9installed on your computer. -
Download the latest version of
meditabs.jarhere. -
Copy the
meditabs.jarfile to the folder you want to use as the home folder for your MediTabs application. -
Double-click the file to start the app. The GUI should appear in a few seconds.
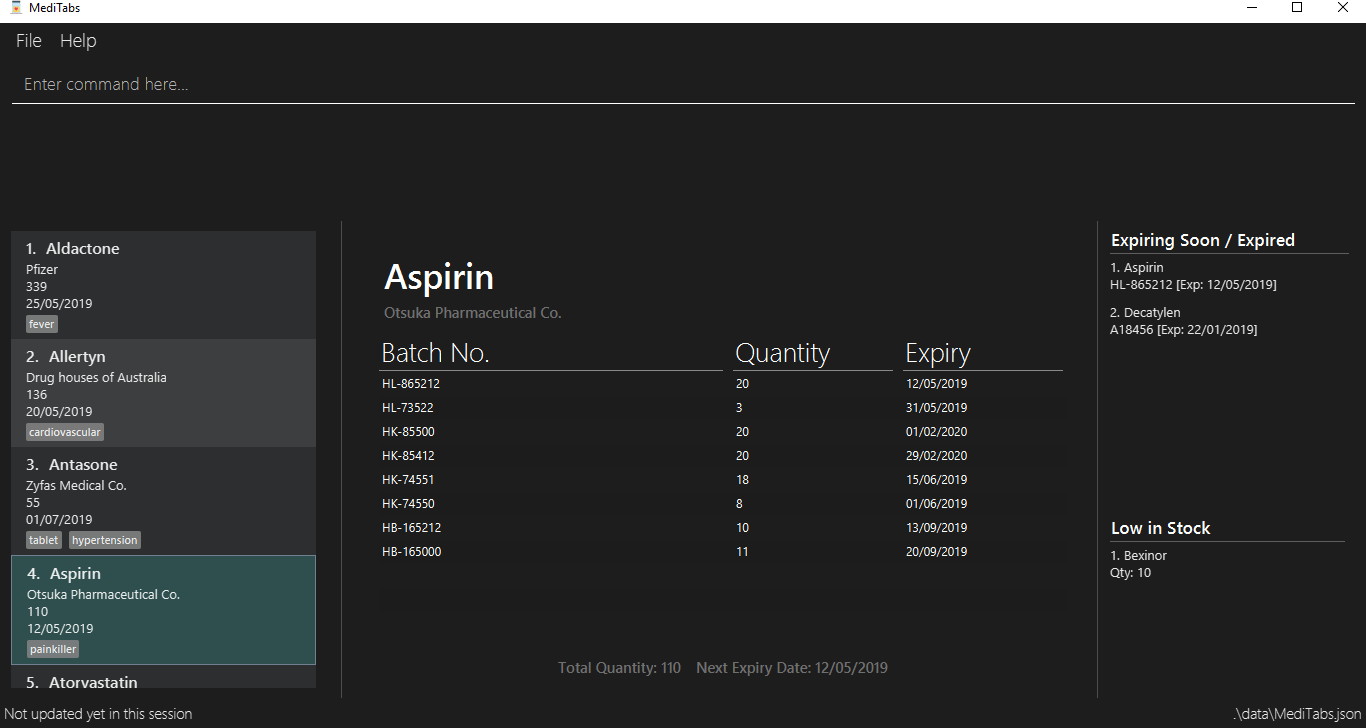 Figure 1. MediTabs
This program requires a minimum resolution of 1200*810. Best viewed in full screen.
-
Type a command in the command box and press Enter to execute it.
e.g. typinghelpand pressing Enter will open the help window. -
Some example commands you can try:
-
list: lists all medicines in the inventory -
addn/Paracetamol c/3M Pharmaceuticals: adds a new medicine namedParacetamolto the inventory with the manufacturing company3M Pharmaceuticals -
delete3: deletes the 3rd entry shown in the current list -
exit: exits the application
-
-
You can refer to Section 5, “Commands” for details of each command.
-
Having trouble setting up MediTabs? You can refer to the Section 6, “Frequently Asked Questions (FAQ)” for solutions to common problems you might encounter. Do you require further assistance? If so, you can also post your queries here and our team will do our best to assist you.
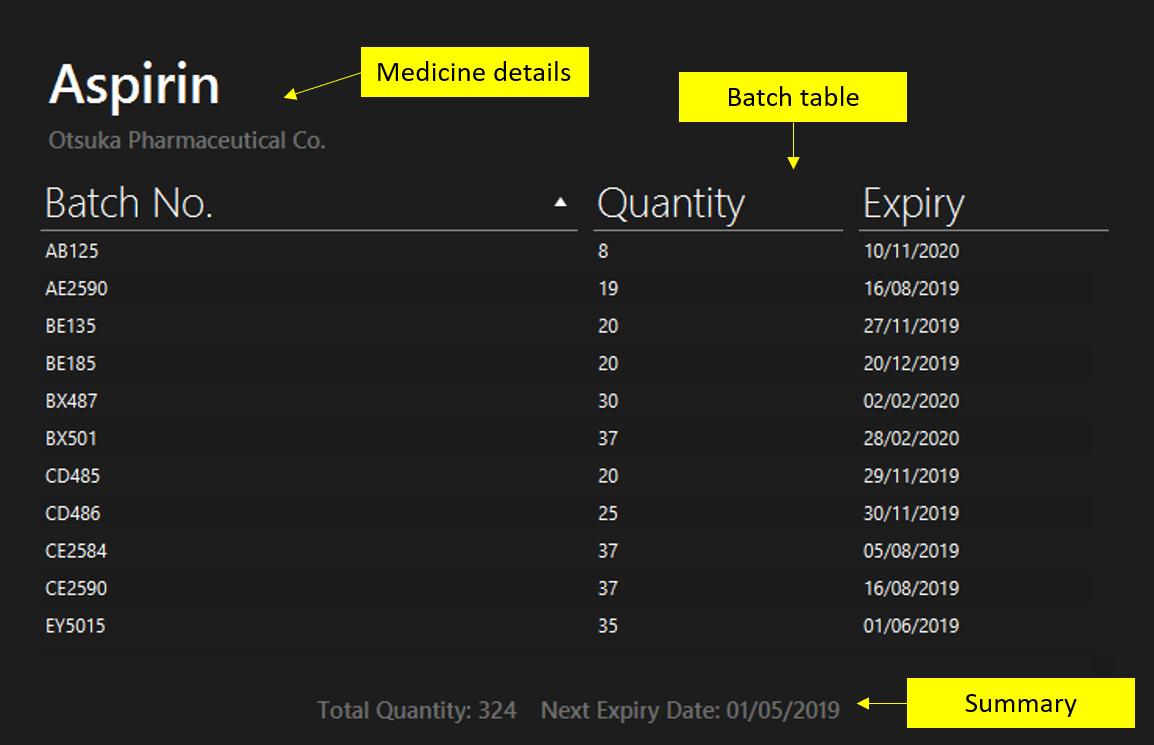
3. Application Interface
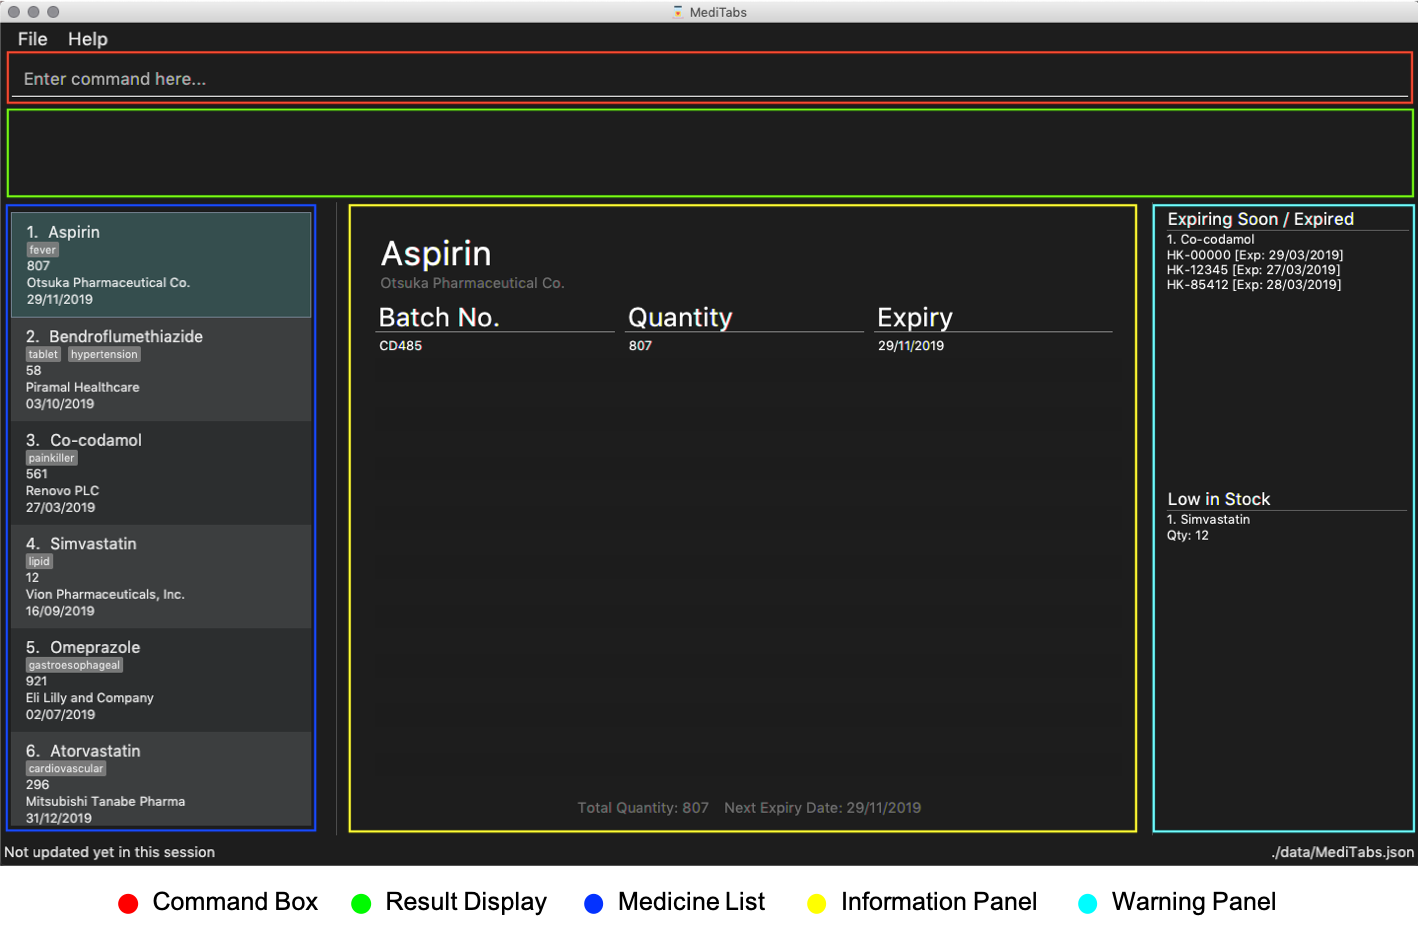
Command Box
-
Type commands into the command box and press Enter to execute them.
-
You may refer to Section 7, “Commands Summary” for a list of all possible commands.
Result Display
-
The result from executing the command will be displayed in the Result Display.
-
If commands are entered incorrectly, error messages will be shown here.
Medicine List
-
Medicine list provides a list view of the inventory.
-
The list may contain all medicine in the inventory, or a filtered view if the
findcommand was executed. -
The list is sorted lexicographically by medicine name, insensitive to casing.
Information Panel
-
You can select a medicine from the medicine list by using the
selectcommand. e.g.select 1selects the first medicine in the list. -
After selecting a medicine, information about the medicine will be displayed in the information panel.
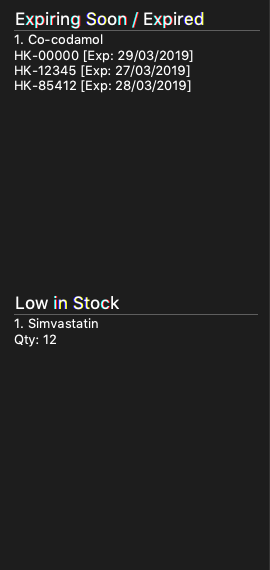
Warning Panel
-
The warning panel displays a list of medicines running low on stock and a list of expiring/expired medicine batches.
-
Warnings will be logged in the warnings panel until changes are made to medicines and/or batches displayed, or to the thresholds controlling what is displayed.
-
Image below shows the labelled components of the warning panel:
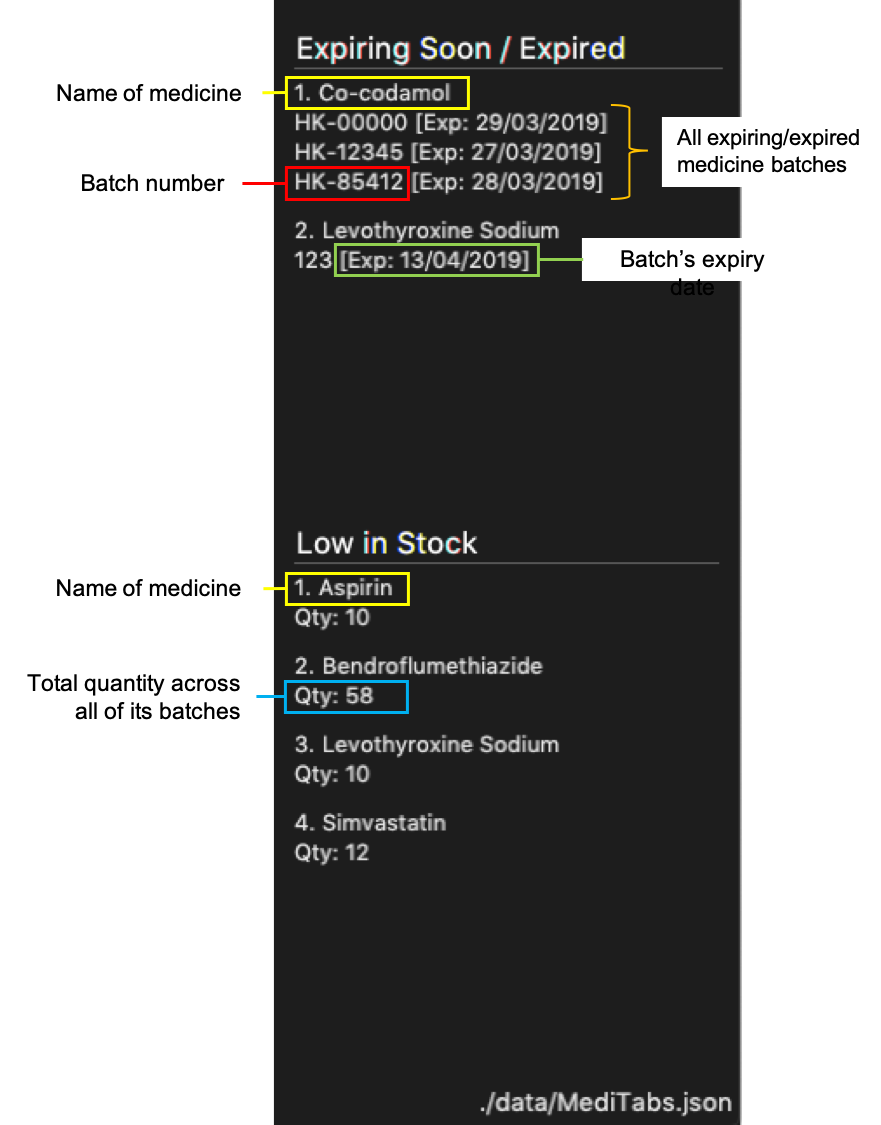 Figure 2. Labelled warning panel
4. Features
As an inventory management application, MediTabs supports basic functionalities (add, edit, delete, list). On top of these basic functions, MediTabs also boasts several features tailored to your needs. These features aim to streamline your inventory management process, thereby enhancing your user experience.
4.1. Information Panel
Having a way to keep track of individual batches of medicine makes medicine management more efficient as problematic batches can easily be located and removed. However, with so many different batches of the same medicine, you need an effective way to organize them or it could get confusing.
The information panel provides all the details and information you need about each batch of medicine in a neat and organized manner.
You can easily refer to the batch table provided in the information panel while updating and managing your inventory. Simply select a medicine using the select command to view all its relevant details. You may refer to Section 5.7, “Viewing medicine information page : select” for more details.
You can also sort the table by any of its columns with the sort command to suit your needs and preference. You may refer to Section 5.8, “Sorting the batch table : sort” for more details.
4.2. Warning Panel
The warning panel provides an overview of pressing issues that have to be taken care of. With a quick glance, you will be able to identify expiring or expired batches of medicine, and medicines running low in stock.
On top of that, the warning panel features flexible thresholds that can be changed according your needs and preferences with a simple command, adding to your user experience.
You can learn about related commands related in Section 5.10, “Managing the warning panel : warning”.
4.3. Exporting as CSV file format
You can export the current medicine inventory data shown in the GUI as Comma-separated values (CSV) file format which is supported by many commonly used spreadsheet applications such as Microsoft Excel (Windows), LibreOffice (Linux) or Numbers (macOS).
Motivation
This feature is especially useful if you want to save the current medicine inventory data shown in the GUI in a file so that it can be printed later or if you want to organise the medicine inventory data using a spreadsheet application for you, your superior or your supplier’s reference.
In addition, you can even use the spreadsheet application to convert the CSV file to Microsoft Excel format and use all the functionalities provided by Microsoft Excel such as drawing graphs or chart to display the overview of your clinic’s medicine inventory.
You can use the export command to take advantage of this feature. You can learn more about how to use the export command here.
4.4. Coming in v2.0
Our team is constantly working to improve your user experience. Here are some features to look forward to in our next release.
4.4.1. Suggested medicine names
When typing fields that include medicine name, a list of suggested medicine names will appear after you input the first letter.
|
Press the ↑ and ↓ arrows to select from the generated list of suggestions. |
4.4.2. Inventory Forecasting
MediTabs will store information about your monthly stock level and predict the optimal amount of stock needed for the future. It will be possible to forecast inventory needs up to 3 months in advance with no extra effort from you as all analysis and calculations will take place with data already provided by routine use of MediTabs. It will also be possible to import past inventory data to increase accuracy of forecasting immediately without having to wait for the application to collect data.
| Importing or allowing MediTabs to collect data for 6 months or more will produce a more accurate forecast. |
4.4.3. Integration Addon Support
You can download and install integration addons created for MediTabs such as addons which allows MediTabs to integrate with different third party services which your clinic might currently be using.
Format: install an/NAME_OF_ADDON
| Only integration addons that have been verified by our team can be downloaded and installed in MediTabs. This is to ensure that the addons are secure and have no malicious code due to the increasing cybersecurity threat. |
Benefits of integration addon support are as follows:
-
Provides greater flexibility as as you might choose to integrate with different third-party services which are currently used by your clinic, to allow for easier transition between services.
-
Allows you to customise MediTabs with features that your clinic requires without any unnecessary features which might not be relevant to your clinic’s workflow.
An example of an integration addon which would be supported by MediTabs:
-
Singapore’s Health Sciences Authority (HSA) - To integrate the Singapore HSA’s medical database with MediTabs which allows easy retrieval of important information such as when medicine is requested to be recalled by the HSA.
| This feature can be improved to support medical databases of different countries. |
4.4.4. Encrypting data files
Due to the nature of medical inventories, the integrity of data stored is of utmost importance. The next release will feature data encryption to keep your inventory safe and keep unauthorised users away. With this feature, you will be required to log in with a password to view and edit your inventory. This feature can be disabled if it is not required for your needs.
4.4.5. Preview of results
Preview of results for Export and Label Commands to be available in the UI.
-
Current implementation: You may have to manually search for the external files created in their respective folders.
-
In v2.0, a snapshot of the resulting files will be previewed under the UI for easier reference. This further streamline the inventory management and improve your usability.
-
Below is a mock up on how the UI may look like with the features integrated.
4.4.6. Importing pictures
Import of pictures to aid in the medicine identification.
-
Pictures and snapshot of the medicine may be added to MediTabs such that it is easier for you to identify what the physical medicine looks like.
5. Commands
Command Format
-
Words in
UPPER_CASEare the parameters to be supplied by the user e.g. inadd n/NAME,NAMEis a parameter which can be used asadd n/Paracetamol. -
Items in square brackets are optional e.g
n/NAME [t/TAG]can be used asn/Paracetamol t/feveror asn/Paracetamol. -
Items with
… after them can be used multiple times including zero times e.g.[t/TAG]…can be used ast/fever, t/painkiller t/inflammationetc.. -
Parameters can be in any order e.g. if the command specifies
n/NAME c/COMPANY_NAME,c/COMPANY_NAME n/NAMEis also acceptable. -
INDEXrefers to the index number shown in the displayed medicine list. The index must be a positive integer 1, 2, 3, … -
If only one input is required but more than one valid input is entered, only the last input will be registered e.g.
n/Paracetamol n/Ibuprofen, onlyIbuprofenis registered.
5.1. Viewing help : help
Format: help
5.2. Adding a new medicine : add
Adds a new medicine to the inventory.
Format: add n/NAME c/COMPANY_NAME [t/TAG]…
| Medicines already in the inventory cannot be added again. A duplicate medicine is one with the same name and same manufacturing company. |
Examples:
-
add n/Paracetamol c/3M Pharmaceuticals -
add n/Ibuprofen c/Takeda Pharmaceutical Co. t/fever
5.3. Listing all medicines : list
Shows a list of all medicine in the inventory.
Format: list
5.4. Locating medicines : find
Finds medicine whose details contain any of the given keywords and displays them in the list.
Format: find PREFIX KEYWORD [MORE_KEYWORDS]…
Examples:
-
find n/ Sodium
Levothyroxine SodiumandNaproxen Sodiumare displayed in the list. -
find c/ 3M Johnson Pharmaceutical
All medicines from companies with names containing3M,JohnsonorPharmaceuticalsuch as3M Pharmaceuticalsare displayed in the list. -
find t/ fever
All medicines with tagfeverare displayed in the list. -
find b/ NDC
All medicines with batches with batch number containingNDCsuch asNDC 0777-3105-02are displayed in the list.
5.5. Editing a medicine : edit
Edits an existing medicine in the inventory.
Format: edit INDEX [n/NAME] [c/COMPANY_NAME] [t/TAG]…
Examples:
-
list
edit 2 n/Prednisone c/Johnson & Johnson
Edits the name of the 2nd medicine in the list to bePrednisoneand company to beJohnson & Johnson. -
find n/ Prednisone
edit 1 t/
Remove tags from the 1st medicine in the results of thefindcommand.
5.6. Deleting a medicine : delete
Deletes the specified medicine from the inventory.
Format: delete INDEX
Examples:
-
list
delete 2
Deletes the 2nd medicine in the list. -
find n/ Gabapentin
delete 1
Deletes the 1st medicine in the results of thefindcommand.
5.7. Viewing medicine information page : select
Selects a medicine and loads the information page of the medicine.
Format: select INDEX
Examples:
-
list
select 2
Selects the 2nd medicine in the inventory and loads its information page. -
find n/ Gabapentin
select 1
Selects the 1st medicine in the results of thefindcommand and loads its information page.
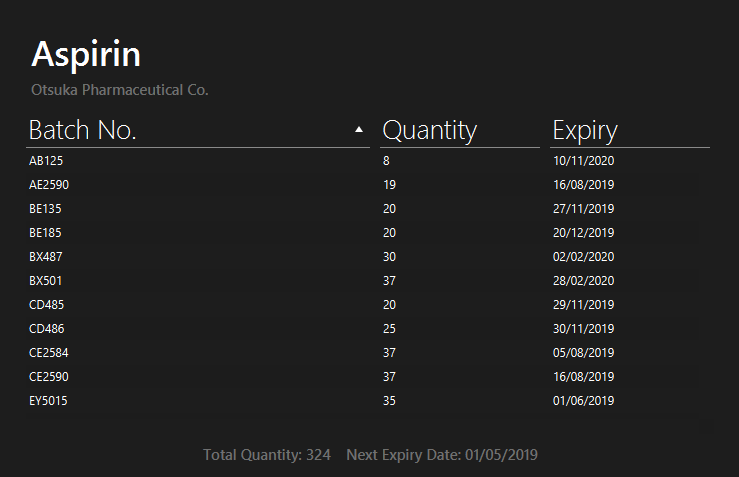
5.8. Sorting the batch table : sort
Sorts the batch table in the medicine information page based on the entered property and direction
Format: sort p/PROPERTY d/DIRECTION
Examples:
-
sort p/expiry d/descending
The table is sorted starting from the batch with the furthest expiry date. -
sort p/quantity d/ascending
The table is sorted starting from the batch with the lowest quantity.
5.9. Updating batch records : update
Updates batch details of a medicine.
Format: update INDEX b/BATCH_NUMBER [q/QUANTITY] [e/EXPIRY_DATE]
Examples:
-
list
update 2 b/NDC 0777-3105-02 q/30 e/11/2/2020
Updates quantity and expiry date of batchNDC 0777-3105-02in the batch records of the 2nd medicine in the list to30and11/2/2020. A new record is created if batchNDC 0777-3105-02did not already exist. -
find n/ Gabapentin
update 1 b/GKP1684 q/50
Updates quantity of batchGKP1684in the batch records of the 1st medicine in the results of thefindcommand to50. An error message is shown if batchGKP1684did not already exist. -
list
update 1 b/HK85412 q/0
Removes batchHK85412from the batch records of the 1st medicine in the list. An error message is shown if batchHK85412did not already exist.
5.10. Managing the warning panel : warning
Manage the threshold for expiry date and low stock warnings to alter the contents of the warning panel.
Format: warning [e/EXPIRY_THRESHOLD] [q/LOW_STOCK_THRESHOLD] [SHOW]
Provide only one of the optional fields available.
If the thresholds are not set, the default threshold for expiry will be 10 days, and 20 for low stock.
Thresholds set by the user are saved and will be used when the application is launched again.
|
All thresholds must be positive integers. |
Examples:
-
warning e/30
Medicine batches that have expired or with expiry dates within 30 days to expiry from today will be displayed in the warning panel. -
warning q/10
Medicines with a total quantity of less than or equal to 10 will be displayed in the warning panel. -
warning show
Current thresholds used for the warning panel will be shown in the result display.
5.11. Exporting as CSV file format : export
Exports the current medicine inventory data shown in the GUI as CSV file format.
Format: export [FILE_NAME]
| Medicines without any batches are not included in the exported CSV file as they would not have any useful information such as the quantity and expiry dates which are important in the keeping track of your medicine inventory. This is by design, as our team believes that the exported CSV file should only provide useful detailed information. |
Examples:
-
export
Exports the current medicine inventory data shown in the GUI to a CSV file which has a default file name format{Date of export}_{Time of export}. e.g.18_Mar_2019_10_28_00 -
export example
Exports the current medicine inventory data shown in the GUI to a CSV file which has the filenameexample.
If a file with the specified file name already exists in the default exported folder, the file would not be exported and an error message "Could not export data to csv file: {Specified File Name} already exists in "exported" directory"
|
A sample image of how the medicine inventory data in the exported CSV file is organised:
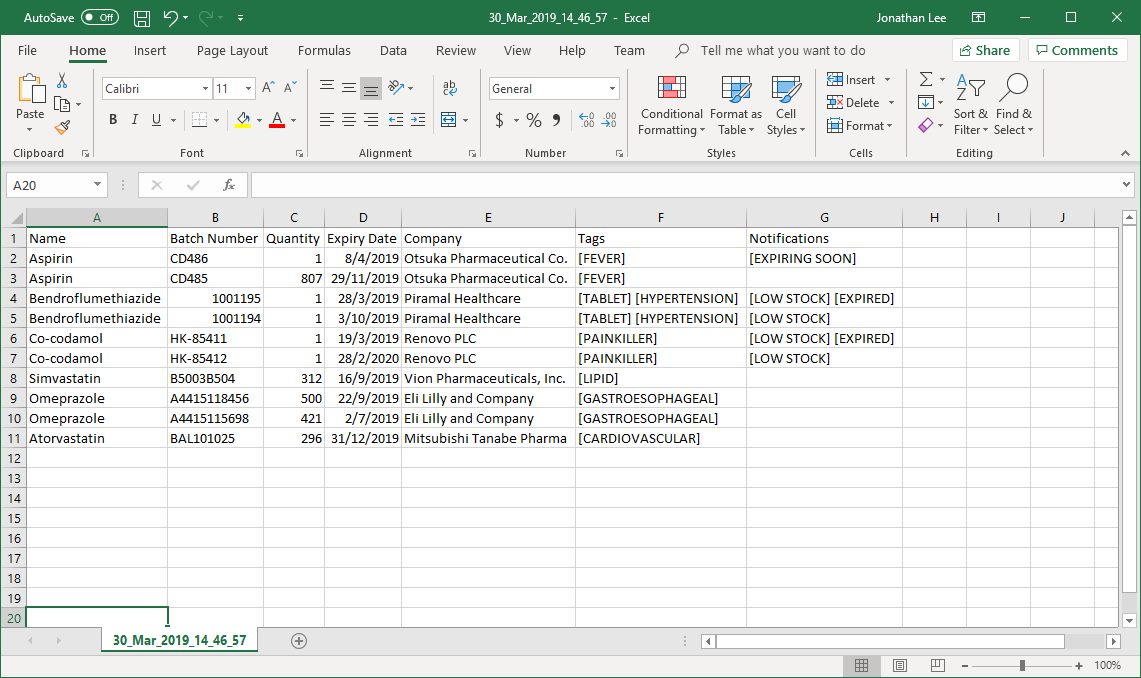
| From the image above, you can observe that the exported CSV file only contains essential information such as the medicine batches, quantity and expiry date for each batch of medicine and which medicines are low in stock, expiring soon or have expired for easier reference. |
5.12. Printing labels : label
-
You can label any specific medicine information in the inventory through the Portable Document Format (PDF).
Open the PDF file under the PDF folder to view and print your selected medicine. -
Label will include name of medicine and standard label template.
This includes the company that manufactured it, expiry date and the tags that was set with it. -
Your format for using the command should follow:
label INDEX [f/FILE_NAME] -
File name is optional.
All PDF files can be found under the PDF folder
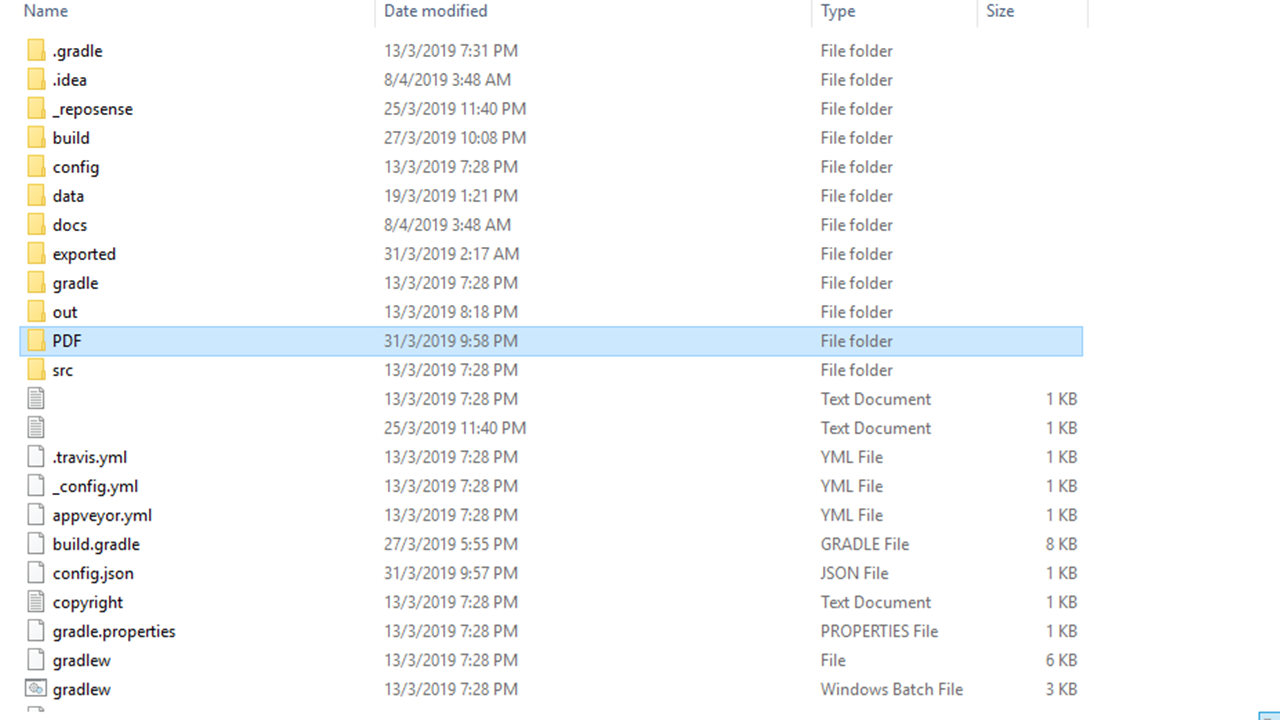
Fig 5.12.1 PDF folder highlighted
Examples:
-
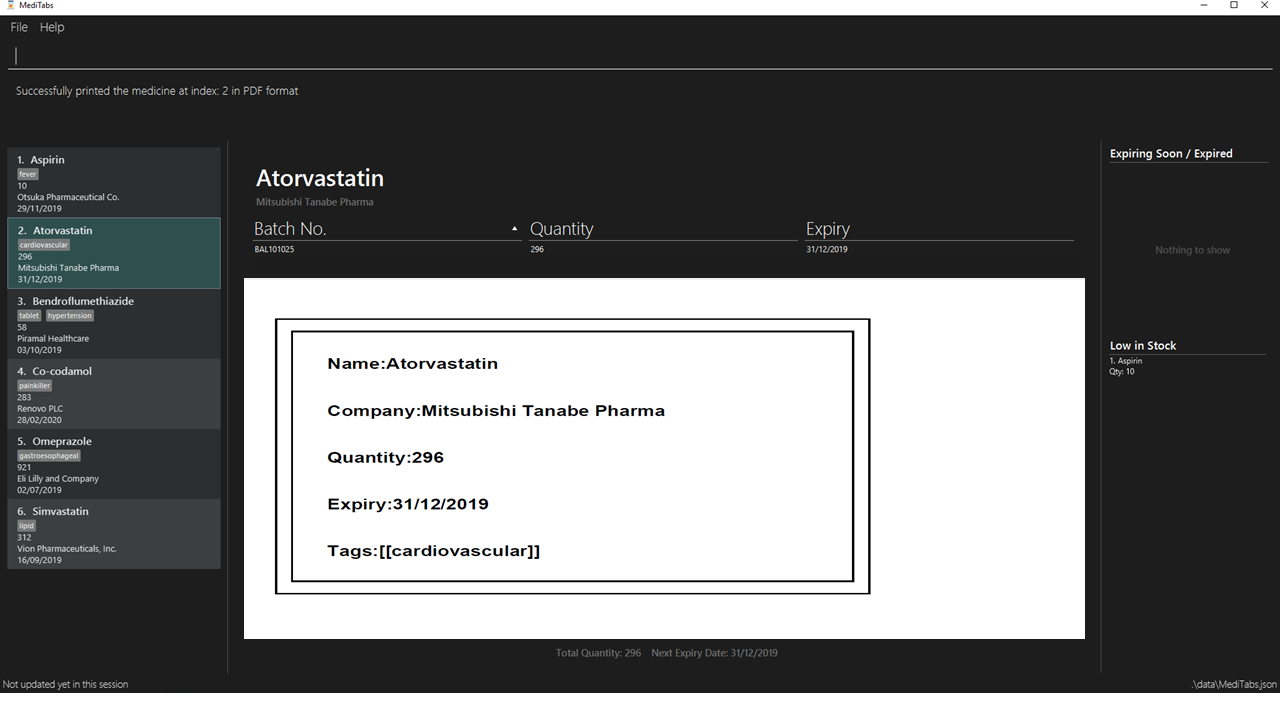
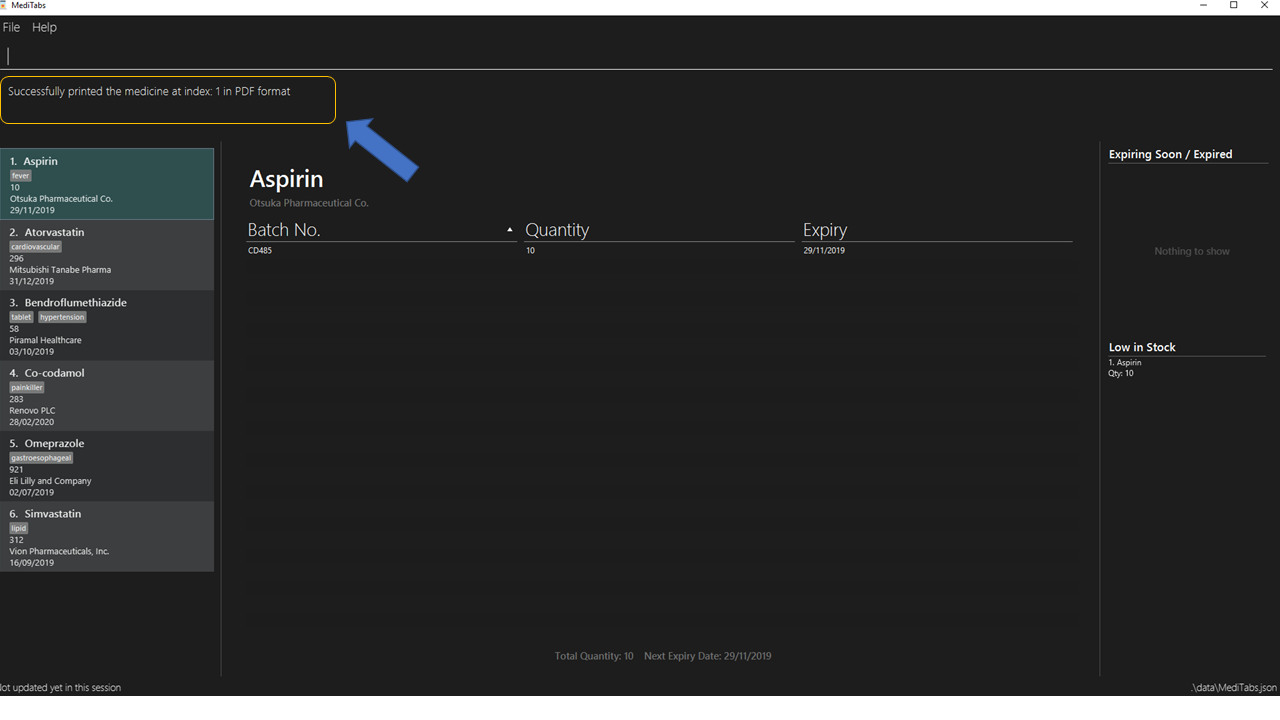
Open up the software interface. (Fig 5.12.2)
Fig 5.12.2 Software interface
-
Key in
listfollowed by
label 1.
This selects the 1st medicine in the inventory and output the information to a default PDF file namedto_print.-
A confirmation message will be shown to indicate to you that it have been successfully labeled.
-
-
You can open the file in the PDF folder (Fig 5.12.1) with your preferred PDF reader to print the medicine information.
A example below of how the label information will look like (Fig 5.12.2)
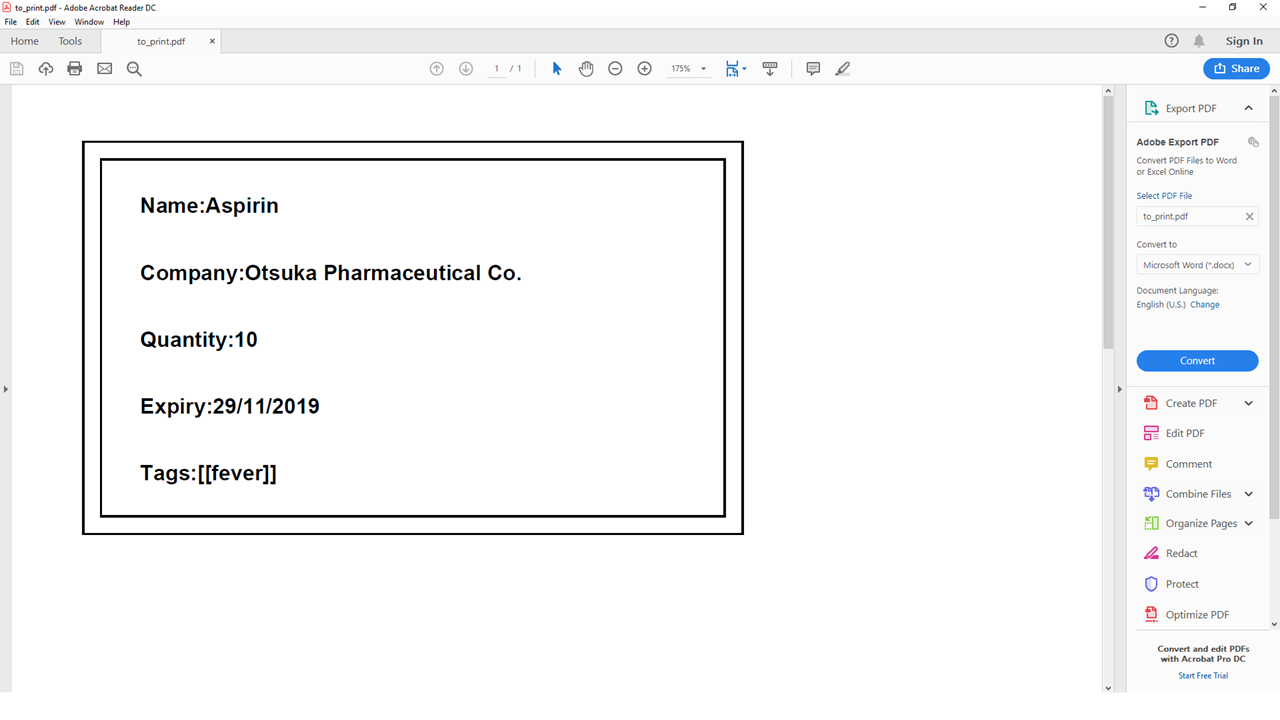
Fig 5.12.2 Medicine information
-
If you want to name the output file, follow the steps below:
-
find n/ Simvastatin
label 1 f/Simvastatin
Similar to the example above, the 1st medicine information will be output to a file nameSimvastatin. (Fig 5.12.3)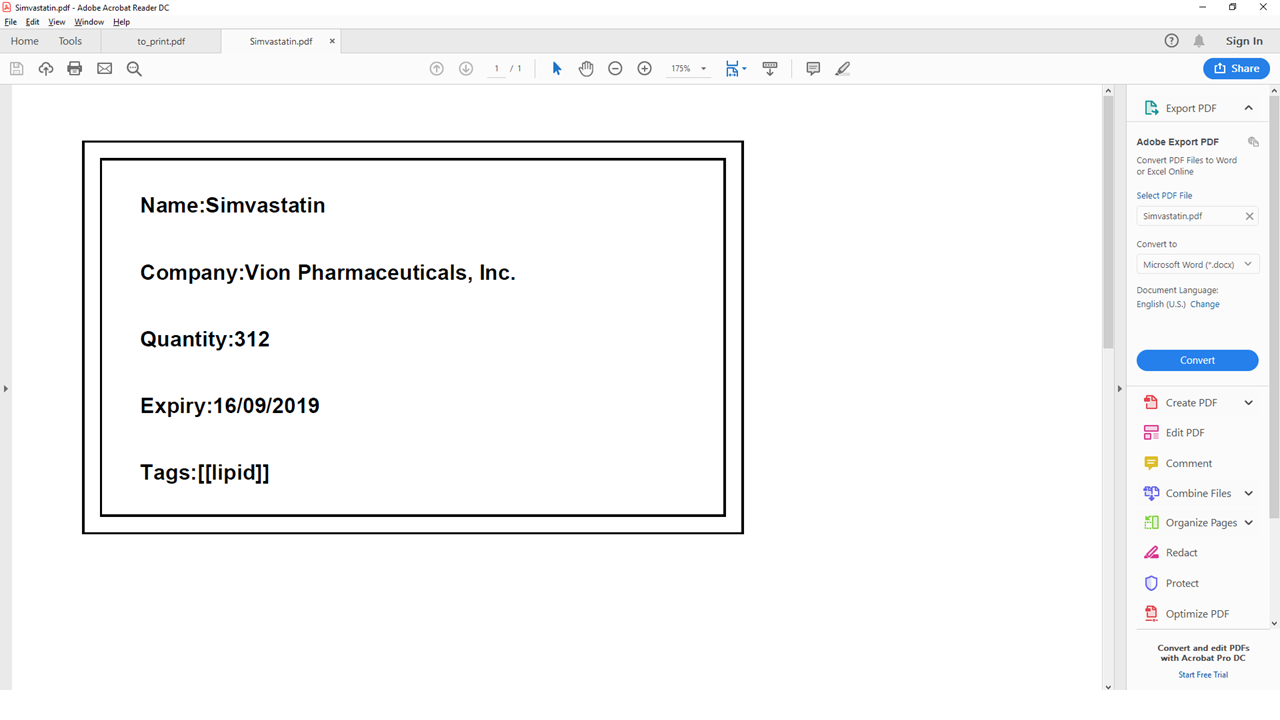
Fig 5.12.3 Simvastatin medicine information
The labelcommand will overwrite theto_printfile when filename is not specified. Do print the required file first before using thelabelcommand again.-
Please follow Appendix A for naming conventions.
-
-
5.13. Listing entered commands : history
Lists all the commands that you have entered in reverse chronological order.
Format: history
|
Pressing the ↑ and ↓ arrows will display the previous and next input respectively in the command box. |
5.14. Undoing previous command : undo
Restores the inventory to the state before the previous undoable command was executed.
Format: undo
|
Undoable commands: those commands that modify the inventry’s content ( |
Examples:
-
delete 1
list
undo(reverses thedelete 1command) -
select 1
list
undo
Theundocommand fails as there are no undoable commands executed previously. -
delete 1
clear
undo(reverses theclearcommand)
undo(reverses thedelete 1command)
5.15. Redoing the previously undone command : redo
Reverses the most recent undo command.
Format: redo
Examples:
-
delete 1
undo(reverses thedelete 1command)
redo(reapplies thedelete 1command) -
delete 1
redo
Theredocommand fails as there are noundocommands executed previously. -
delete 1
clear
undo(reverses theclearcommand)
undo(reverses thedelete 1command)
redo(reapplies thedelete 1command)
redo(reapplies theclearcommand)
5.16. Clearing all entries : clear
Clears all entries from the inventory.
Format: clear
5.17. Exiting the program : exit
Exits the program.
Format: exit
5.18. Saving the data
Inventory data is saved in the hard disk automatically after any command that changes the data.
There is no need to save manually.
6. Frequently Asked Questions (FAQ)
Q: Where can I find Java version 9?
A: You can download Java version 9 here. We recommend installing Java SE Development Kit 9.0.4 on your computer.
Q: (Windows Only) I followed the instructions in Section 2, “Quick Start” but the GUI did not appear?
A: This is a commonly known issue with JDK on Windows. You can learn more about the issue here: Link
We recommend following the steps below to solve this issue:
-
Ensure that you only have Java version
9installed on your computer. Uninstall any other versions of Java which might be present on your computer. -
Download the latest version of
jarfix.exehere. -
Double-click the file to allow the program to fix this issue.
If you encounter any problems running jarfix.exe, you can read the documentation available on the website for more detailed instructions on how to run the program on your computer.
|
Q: How do I transfer my data to another Computer?
A: Install the app in the other computer and overwrite the empty data file it creates with the file that contains the data of your previous MediTabs folder.
7. Commands Summary
-
Add
add n/NAME c/COMPANY_NAME [t/TAG]…
e.g.add n/Paracetamol c/3M Pharmaceuticals t/fever -
Clear :
clear -
Delete :
delete INDEX
e.g.delete 3 -
Edit :
edit INDEX [n/NAME] [c/COMPANY_NAME] [t/TAG]…
e.g.edit 2 n/Amoxicillin c/GlaxoSmithKline t/antibiotic -
Exit :
exit -
Export :
export [FILE_NAME]
e.g. export Records -
Find :
find PREFIX KEYWORD [MORE_KEYWORDS]…
e.g.find n/ paracetamol -
Help :
help -
History :
history -
Label :
label INDEX
e.g.label 1 -
List :
list -
Redo :
redo -
Select :
select INDEX
e.g.select 2 -
Sort :
sort p/PROPERTY d/DIRECTION
e.g.sort p/quantity d/ascending -
Undo :
undo -
Update :
update INDEX b/BATCH_NUMBER [q/QUANTITY] [e/EXPIRY_DATE]
e.g.update 2 b/A030F21 q/1000 e/25/1/2020 -
Warning :
warning [e/EXPIRY_THRESHOLD] [s/LOW_STOCK_THRESHOLD] [SHOW]
e.g.warning e/20,warning s/10,warning show
8. Terminology
-
List: This refers to the currently displayed list (possibly filtered).
-
Inventory: This refers to the storage containing all medicines that have been added. Display all medicines in the inventory by using the
listcommand. -
Batch: This refers to a group of medicine with the same name, medical properties and manufacturing date. There may be more than one batch of medicine with the same name, but they will have different batch numbers and manufacturing dates. View all batches of a medicine by using the
selectcommand.
9. Appendix A: File Naming Convention
MediTabs uses the following file naming convention when file name field is used e.g. The export command’s optional [FILE_NAME] field. The file naming convention is to ensure consistency and to avoid potential bugs involving file names with different operating systems such as Windows, Linux and macOS
Format: Start with an alphabet or number followed by alphabets, numbers, underscore or hyphen
File name does not include file extension such as .csv and .pdf. You do not have to include file extension when specifying the file name field such as in export [FILE_NAME]. MediTabs will handle the file name extension for you.
|
Examples of correct and incorrect file names:
| Correct | Incorrect |
|---|---|
|
|
|
|
|
|
|
|
| You must follow the file naming convention format when specifying the file name field for any commands that support file name as a field. |
The characters of the file name cannot contain any spacing or symbols, including but not limited to, \/:*?"<>|.+[]{};!@#$%^&~` Reserved names, indicated in Windows documentation, are also not allowed to be used as file names such as COM1 and LPT8. The reserved names are case insensitive for example, com1 or CoM1 are also reserved names. You can read more about file naming conventions in Windows here.
|